Logo

Downloaded Lists

Downloaded lists are compilations of email addresses or contacts that you have retrieved from the ConnectPlex platform. These lists are handy when you need to work with your data outside the platform or perform offline analyses. You can download these lists from the ConnectPlex dashboard and utilize them as needed.

For downloading lists, please use the following steps
  • After logging in, search for your target audience by filling up the appropriate fields in the global search. After filling the required fields, please click on 'Search'.
  • You can then click on 'box' () next to the the appropriate names in the search results and click on ‘Export and Download CSV’.
    • In case you would like to download the entire list, then please click on the ‘box’ next to ‘Name’ ( ) on the top of the list. This will select the entire list.
    • Please note that by default only 10 search results are shown. In case you would like to show a larger list, then please click on the drop down menu in the bottom right of the search result ( ), and you can choose up to 1000 search results at one go.
  • After you’ve chosen the appropriate list, please click on ‘Export and Download CSV’.
  • In the ‘Download CSV’ form, add any ‘Reference name’ for this list.
  • Now, click on Lists > Downloaded Lists. You may need to wait for 10 - 15 minutes for your list to be ready for downloading. If required please ‘refresh’ your browser once.
  • Once the processing of your list is complete, please click on ‘Download CSV (Verified)’ ( ) under ‘Actions’ for your list. Please note that we recommend downloading only verified data since these email addresses are reverified and revalidated by ConnectPlex prior to download. With this, your list will be downloaded to your computer as a CSV file.
Steps to Create an Email Campaign on Downloaded List
  • Click on the Send Follow-Up Email icon under the Actions column.
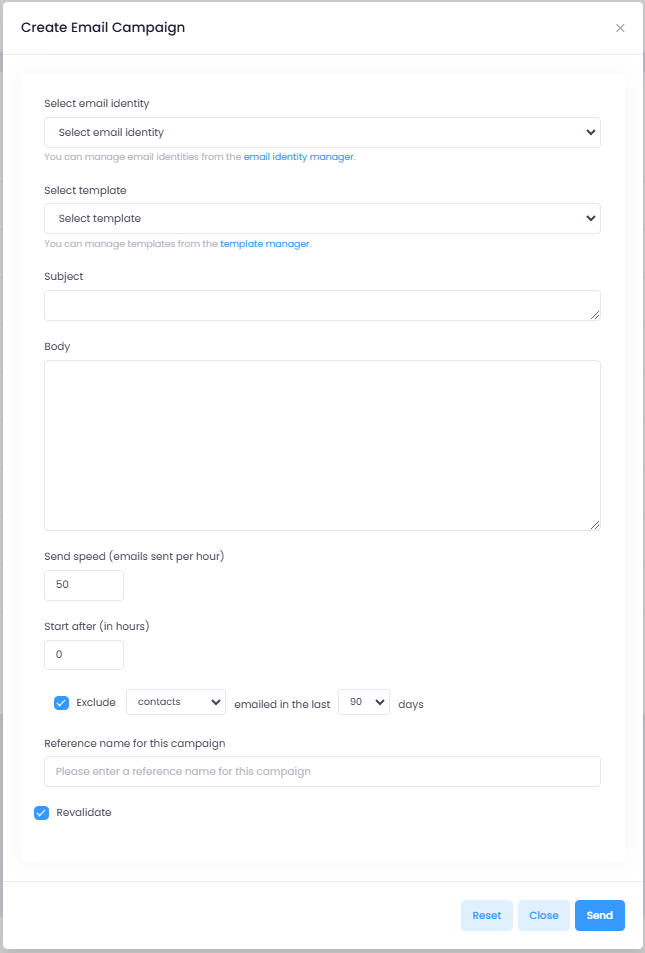
  • A new "Create Email Follow-Up" screen will appear as below.
  • Select Email Identity: Choose an email identity from the dropdown menu. You can manage identities via the Email Identity Manager.
  • Choose a Follow-Up Template: Select a template from the dropdown list. Templates can be managed in the Template Manager.
  • Edit Template (If Needed):
    • If you need modifications, go to the Template Manager, make changes, and save them.
    • After saving, restart the process from the beginning.
  • Set Sending Preferences:
    • Send Speed: Define the number of emails to be sent per hour.
    • Start After (in hours): Specify when the campaign should begin.
  • Exclude Previously Emailed Contacts (Optional):
    • Check the Exclude box if you want to avoid sending emails to contacts who have already received an email within a set number of days.
    • Choose the time frame in days from the dropdown.
  • Add a Reference Name: Enter a reference name for this campaign to track it easily.
  • Uncheck the Revalidate option.
  • Finalize the Campaign:
    • Click Send to start the campaign.
    • Click Reset to clear all fields.
    • Click Close to exit without saving.

This process ensures an effective email setup for initiating Campaign using the downloaded list.